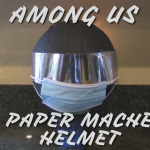
Lip Scrub

Lip Scrub

Take off dry skin on your lips with this scrub!

Supplies

  • Sugar
  • Honey
  • Olive Oil

Instructions

  1. Two scoops of sugar
  2. One spoonful of olive oil
  3. One spoonful of honey
  4. Mix it

DIY Shrinky Dink Keychains

Supplies

  • Shrinky dink sheet(s)
  • Scizzors
  • Hole-puncher
  • Oven
  • Permanent marker(s)
  • Baking sheet
  • Parchment paper
  • Keychain chains

Instructions

  1. Sketch out designs
  2. Draw designs on shrinky dink sheet
  3. Color design with permanent marker(s)
  4. Preheat oven to 250 degrees
  5. Cut out keychain charms and poke a hole out with a hole-puncher
  6. Place keychain charms on a baking sheet with parchment paper
  7. Put in oven for 3-5 minutes
  8. Turn off oven
  9. Connect charms to keychains

Thanksgiving Pop-Up Card

Thanksgiving Pop-Up Card

Make your Thanksgiving popping with this card!

Supplies

  • Brown paper
  • Orange paper
  • Yellow paper
  • Scissor
  • Pen
  • Pencil
  • Glue

Instructions

  1. Fold the brown paper and cut it in half
  2. Cut both pieces of brown paper into squares
  3. Fold both squares in half
  4. Take one of the squares and fold the corners inwards
  5. Fold that piece in half again and cut the corners into rounded edges
  6. take the other half and cut one of the corners into rounded edges
  7. Grab the yellow paper and fold it in half
  8. Grab the round paper and place it on the middle part of the yellow paper
  9. Make sure the fold of the round paper is facing inward
  10. Glue the bottom folds of the round paper onto the yellow paper
  11. Grab the other brown paper and place it between the yellow and brown paper
  12. Make sure that the fold is facing outwards
  13. Glue the top folded corners to the other brown paper
  14. Cut the round edge to make feathers
  15. Grab one of the excess brown paper and cut out a neck and head
  16. Glue those onto the body and make sure the head is not over the fold
  17. Grab the orange paper and cut out legs, beak, and leaves
  18. Glue the legs, beak, and leaves onto the card
  19. Draw eyes and details for the leaves
  20. Add phrases and decorate your card to your fitting

Flip Book

Flip Book

Bring any notepad to life!

Supplies

  • Pencil
  • Pen
  • Paper Pad

Instructions

  1. Plan out your animation path, keeping in mind how many frames/pieces of paper you’ll need.
  2. To give your animation more life, keep in mind the 12 principles of animation
  3. Flip back and forth between pages, outlining your animation with pencil.
  4. Flip through to check your pacing
  5. Trace with pen when you’re happy with it!

Among Us Paper Mache Helmet

Among Us Paper Mache Helmet

Among Us Paper Mache Helmet

Supplies

  • 1 Part Flour
  • 1 Part Water
  • Bowl/container
  • Newspaper/magazine paper strips
  • Balloons
  • Plastic Face Shield visor
  • String
  • Pen/marker
  • Scissors
  • Tape
  • Mirrored Window Tint
  • Spray Paint
  • Hot Glue

Instructions

To start:

  1. Mix equal parts of flour and water to make paper-mache paste.
  2. Blow up the balloon to desired size.  It should be slightly larger than your head.
  3. Tear the paper into strips, dip into the paste, and put it on the balloon.
  4. Repeat until the balloon is covered with about 2 layers of paper.
  5. Let it dry for at least 4 hours.

In the meantime, make the visor.

  1. Measure ear-to-ear and eyes-to-nose for length and width of the plastic visor.
  2. Cut visor to the same measurements.
  3. Cut mirrored window tint to the same measurements.
  4. Spray visor with water.  This will help the tint covering to stick to the plastic.
  5. Apply the covering to the visor.

Once the balloon is dry:

  1. Spray paint the helmet and let it dry.
  2. Pop the balloon and remove from the shell.
  3. Trim the opening to make sure your head will fit through.
  4. Draw a rectangular hole in the front of the helmet to fit the visor.
  5. Cut out the hole.
  6. Hot glue the visor over the hole.

Paper Mache Pencil Holder

Make a Paper Mache Pencil Holder!

Using just a can and some junk mail...

Supplies

  • junk mail (like grocery ads or newspaper)
  • empty can
  • scissors
  • colored paper to decorate
  • flour
  • water
  • bowl
  • spoon

Instructions

  1. Obtain an empty can, make sure it is clean and take the label off
  2. Rip junk mail into strips of paper approximately one inch wide by four inches long
  3. Mix flour and water together until you reach a gluey consistency (see video)
  4. Dunk the paper into the mixture, squeeze off any excess and start wrapping around the can
  5. Complete a few layers of this, and let dry
  6. Cut the colored paper into whatever shape you want to follow for your final design
  7. Using the same method, coat the paper with the “glue” and cover the can with the paper strips
  8. Let dry. Fill the can with writing utensils of your choice!
cardboard automata

Cardboard Automata 2

Designing your own Automata

Build on your skills from the first Cardboard Automata to begin designing your own!

Supplies

  • Cardboard
  • Scissors
  • Wooden Dowels/Skewers
  • Glue
  • Straw

Instructions

  1. Using inspiration from other automata, design the movement you want your automata to have.
  2. Cut out a box with one side exposed, stick in wooden dowel for the central turn mechanism
  3. Arrange your other cardboard pieces
  4. Glue down non-moving cardboard pieces, mark where you’ll have moving cardboard pieces.
  5. Consider the range of movement of the wooden dowels that will move your cardboard pieces when designing your gears.
  6. Place feet on moving wooden dowels to better slide across gears.
  7. Use straws to help guide wooden dowels and reduce friction.
  8. Assemble your pieces together and test before gluing in place. This may take some trial and error. Consider changing the direction of spin, making gears more smooth and moving pieces around.
  9. Decorate!

Cardboard Automaton

Cat Chasing Mouse Automaton

Learn how to make an automaton of a cat chasing a rat! This is a beginner friendly crafts project that will help you understand the basics of the mechanics behind these projects.

Supplies

  • A cardboard box
  • Two skewers
  • Straw
  • Artwork you’d like to see spin
  • Scissors
  • Glue

Instructions

  1. Get a cardboard box and use scissors to cut off the bottom and a side
  2. Using one of the pieces you cut off, cut a small strip of cardboard
  3. Using another piece you cut off, cut two circles with the same diameter
  4. Grab the straw and cut off a piece that is 2cm long
  5. On the top of the box, puncture a hole large enough to fit the straw
  6. On the sides of the boxes, puncture two holes that are across from one another
  7. At the center of the circle, puncture a hole in each
  8. Stick a skewer through a circle and glue them together
  9. Repeat step 7 for the other skewer and circle
  10. Stick one of the skewers through the top hole of the box and cut the remaining end of the skewer. You should have a decent length of the skewer sticking out of the top of the box
  11. Stick the other skewer through the sides of the box and cut off any excess wood. You should have a decent length to spin the skewer
  12. Make sure that the top hole’s circle is sitting on top of the other circle
  13. Take the piece of straw and put it through the top of the box. The straw should be stuck inside the hole of the box with the skewer inside the straw
  14. Grab the cardboard strip and fold the edges of the cardboard away from one another
  15. Glue the cat onto one end and the mouse onto the other end
  16. stick the top skewer through the middle of the cardboard strip
  17. Spin the skewer on the side to see the cat chasing the rat!

Radial Symmetry

Radial Symmetry

Make some cool art!

Supplies

  • Paper
  • Pencil
  • Pen
  • (optional) Coloring pencils, crayon, markers

Instructions

  1. Make your paper into a square.
  2. Fold the paper into a triangle into 8ths.
  3. Draw a pattern on one of the 8ths.
  4. Unfold and trace your pattern with a pen or darker marker.
  5. Fold the paper in half and trace your pattern on the other side of the paper. It would be helpful to have some light underneath your paper.
  6. Keep folding and tracing until you filled every 8th of your paper.
  7. Color it in if you want to!

DIY Jumbo Chalk

DIY Jumbo Chalk

Relive your childhood with some jumbo sized chalk!

Supplies

For the mold:

  • Toilet paper roll
  • Parchment paper
  • Tape
  • Scissors

For the chalk:

  • Cornstarch
  • Water
  • Dye

Instructions

  1. Cut toilet paper roll and tape it to the desired size of your chalk.
  2. Line the sides and bottom of the toilet paper roll with parchment paper and seal it with tape.
  3. Mix equal parts cornstarch and water together or to a thick consistency. Add drops of food coloring for color. (If using natural dyes, the natural dye is quite watery so substitute the water for the dye)
  4. Fill the molds with this mixture
  5. Let dry 12 hours or until solid
  6. Unwrap from the molds.
  7. Use to your heart’s desire! Cleans really easily with a wet paper towel.