lightbox side by side

Lightbox V1.1

Design

Lightbox v1.1 was constructed similarly to our first lightbox, with some minor differences.

lightbox side by side

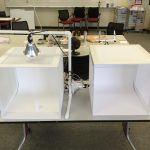
Left: new lightbox, Right: original lightbox

The new lightbox is also constructed from foamboard, posterboard, and a semi-translucent material. The foam board was joined together with hot-melt adhesive (also known as hot glue) rather than duct tape. To reduce waste, the windows panel frames were made from 2 inch strips of foam board, rather than cutting squares out of whole sheets. The construction method is detailed below.

Construction

lightbox miter uncut

A knife was used to divide sheets of foam board into 2 inch strips, 20 inches long. A 45 degree cut was made on both ends of each strip. In this example, shorter pieces are used to demonstrate the process.

lightbox miter cut

After the ends of each strip are cut, hot glue was used to join the foam edges of the strips to form the corners of the frame.

lightbox miter glued

A square was used to ensure that each strip was joined at right angles to make sure the frames of the box fit together properly.

Details

lightbox corner outside

To join the 5 frame pieces together, hot glue was used to join the edges together. Excess glue was spread along the edges to increase strength.

lightbox inside cloth

In the first lightbox, the fibers in the cloth are visible and the material does not disperse the light as evenly, resulting in a more focused spot of light.

lightbox corner inside

The translucent material used is 0.003 inch thick matte drafting film. For the window frame panels, the film is glued onto the inside of the frame.

lightbox inside film

The drafting film allows the light to diffuse more evenly, resulting in better picture quality.

layer-height-1

Layer Height

Definition

The 3D printers in build IT create 3D objects by depositing layers of material incrementally to build a 3D object.

The thickness of each layer of deposited material is called the ‘layer height’.

For Fused Deposition Modeling, or FDM, printers like the ones in build IT, one variable that affects the final quality of a 3D print is the layer height. Typical layer heights are between 0.1 millimeters and 0.5 millimeters. The surface quality of the finished part is proportional to how small the layer height is; smaller layer heights result in smother surface finishes.

Different layer heights affect the time it takes a 3D print to finish.

For FDM printers, the number of layers is one indicator of how much time a 3D print will take. Choosing a smaller layer height will divide a 3D model into more layers, increasing the print time. For example, an object printed at 0.4mm layer height would take half as much time as an object printed at 0.2mm layer height, because there are half as many layers. Due to machine limitations, the minimum layer height for all prints done in build IT is 0.2mm.

Different layer heights are appropriate for different 3D models.

Objects without fine surface details do not benefit from smaller layer heights, so printing them at a larger layer height (closer to 0.4 mm) reduces print time without sacrificing strength or quality. Smaller layer heights (closer to 0.2mm) are only recommended for prints which require better surface finishes, but this limits their overall size because the increased number of layers will take longer.

Example

This object was printed at four different layer heights, indicated by the text on the object. You can see how the quality differs between each section.

layer-height-1

Software

Changing the layer height setting in the model slicing software

cura layer height

Cura

The layer height settings can be found on the first tab under the 'Quality' heading on the left side. Cura will indicate if an improper value is entered in this field.

makerbot layer height

Makerbot Desktop

The layer height settings can be accessed via the 'Settings' window, on the left side. Selecting either Low, Standard, and High quality using the dropdown menu selects different default layer heights.

Plastic Google Cardboard

Plastic Google Cardboard

by Joey Casabar, 2014

Materials

Plastic

Processes

3D modeling, 3D printing

Design Goals

To design a more sanitary and sturdy Google Cardboard

Challenges

The original Google Cardboard design changed. Finding suppliers of the lens.