Halloween DIY Costume Contest 2023

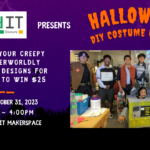
Show us your creepy and otherworldly homemade designs for a chance to win $25!

Stop by build IT makerspace on Tuesday, October 31st (Halloween) between 10 am – 4 pm to enter.

Contest Rules:

  • One aspect of your costume must have been made by you
  • Take a photo with our Halloween backdrop
  • We’ll post it to our Instagram account https://www.instagram.com/buildit.sdsulibrary/
  • The most Likes by Wed, November 1st at 4 pm will win the contest and $25
halloween

Halloween Party 2022

It’s time to celebrate that holiday that truly brings out the most creative nature in each of us, HALLOWEEN!

The build IT makerspace is throwing a Halloween Pizza Party!

WHEN: Monday, October 31, 2022 at 11:30 am – 1:30 pm
WHERE: build IT makerspace, LL 260
WHAT: Wear your best costume and get pizza!

We’ll also be watching the best Halloween-themed movies throughout the day.

See you there and dressed in your best!

RED and BLUE’s Stay at Home Ideas

build IT is all about promoting creativity. Just because we’re not currently open doesn’t mean that has to stop! Making your own stop motion video can be a fun way to spend your time.

This video was made by student assistants Patrick Coh and Chris Potente working from home. Patrick created the animations and edited the video. Chris created the music.

3D printed objects were found on Thingiverse and linked below:

“Eunny” “Flexible Person with Tinkercad” found on Thingiverse- https://www.thingiverse.com/thing:3879833

“alockey” “Creality Ender 3 Dog” found on Thingiverse-https://www.thingiverse.com/thing:3067755

“HPonstein” “Sofa Business Card Holder” found on Thingiverse- https://www.thingiverse.com/thing:2414597

Things you’ll need for your own stop-motion video:

  • A camera with a tripod– it can be a phone camera and anything to hold it in place while you take pictures.
  • Inanimate objects– it helps if the object has a degree of flexibility or if you’re able to create multiple copies of the object in different poses.
  • Tape, glue, play-doh, fishing wire, pebbles– anything to help you secure the object in different poses while you take pictures
  • Your imagination

Steps:

  1. Come up with a story. Write down story beats and create a storyboard so that you have an idea of how you’ll frame your object and set up your camera before hand. Creating a storyboard can also help you figure out where you’ll hide your securing apparatuses in each scene. They can be simple, like stick figures or blobs, but they should be detailed enough so you get an idea of how your object will move.
  2. Split the storyboard into different shot sequences. Note when you’ll move your camera and what’s going to happen in between each camera movement.
  3. Play with your inanimate object, see how it moves and figure our how you’re going to shape it and hold that shape for each frame. Do some simple camera tests to see if your poses will read to the audience.
  4. Set up your scene. See if you’ll need any props or if you’ll need to adjust the lighting to liven it up. Maybe take some test pictures to make sure every action in your scene can be captured.
  5. Make a stop motion! This part can be tedious but it will pay off. Move the object from pose to pose keeping transitions in mind. Snap a picture between each movement. We found it helps to do several “takes” by animating and snapping pictures all the way through one sequence then resetting it. Make sure you watch each take before you move on! This way, you won’t get confused by trying to perfect every shot and you’ll get to see if the sequence works all together.
  6. Assemble your video. Drag your images into a video-editing software. The key here is organization! Make sure to separate different takes and scenes as you’ll likely have an overwhelming number of pictures. Depending on what video-editing software you’re using you may find it easier to either create image sequences or just put your images in one by one. There are pros and cons to both. With discreet images, while you may have a ton of photos, it may be easier to delete unnecessary frames, extend the length of a frame, or duplicate frames. With image sequences, your images are contained in one clip so while you can still do all those things, it may take longer to find frames within the clip.
  7. Add any music or sound effects. Create your own or read up on creative commons and reusing content in our article here.
  8. Add any other embellishments like visual effects, create a larger interactive project, or whatever else you can think of. The sky is your limit here!


ala 2017 poster

ALA 2017

ALA 2017 Poster

This is the companion website to the poster, "How to Leverage your Academic Makerspace to Help Advance Your Local Community," presented at ALA Annual 2017, Chicago, IL

ala 2017 poster

Summary

Background

build IT is the makerspace of the SDSU Library. While it’s purpose is to provide access to technology to students, faculty, and staff, it has helped create opportunities to promote STEM in the San Diego Region. As the librarian, I led the development of various outreach events. However, I make sure to involve SDSU students in every event. Their involvement can vary from co-developing instruction to manning the exhibit table. While the focus is on giving back to the community, the goal of these events is to increase the learning opportunities for SDSU students. Below is a sample from 2015 – 2017.

Why

  • Personal fulfillment of giving back to the community that I grown up in
  • Supporting the University’s Strategic Initiative of “Contributing to the Advancement of the San Diego Region
  • Increasing the networking opportunities and learning experiences for SDSU students
  • Bring STEM education to under-represented communities
  • Advocate for information literacy within STEM disciplines

1. Teen Tech Week: Robotics Challenge

Summary

Location: Poway Branch, San Diego County Library

Date: Mar 11, 2017

Duration: 2 hours

Audience Demographics: Teens

Description: Created an interactive display for teens to explore robotics through active play and learn about FIRST Robotics from local high schoolers. The mentors of the HS Robotics Club are SDSU students.

More Info: 

poway county library

2. STEM Education Economics and Equity Seminar Exhibit

math edu event at sdge

Summary

Location: SDG&E Energy Innovation Center

Date: Nov 29, 2016

Duration: 2.5 hours

Audience Demographics: STEM Educators

Description: Discussed with STEM educators the benefits of a makerspace on education and share how college students learn through making at the build IT makerspace. Also, this was a networking event for librarians to connect with local maker educators.

More Info:  https://newscenter.sdsu.edu/education/crmse/seee_seminar.aspx

3. Aztec Science Summer Camp

Summary

Location: San Diego State University Library

Date: Aug 1 - Aug 12, 2016

Duration: 4 hours per a week

Audience Demographics: Kids, Ages 7 - 14

Description: Taught 3D printing where the kids were able to keep a 3D printed part. Some kids 3D modeled a part that was later 3D printed. SDSU students assisted with developing and teaching the curriculum.

More Info: http://www.sci.sdsu.edu/crmse/aztec_science_camp/about_camp.html

aztec science camp

4. Explore SDSU

sdsu explore

Summary

Location: San Diego State University Library

Date: Mar 14, 2015 & Mar 19, 2016,

Duration: 8 hours per a day

Audience Demographics: All Ages, Future Students

Description: Participated in the SDSU open house where local community members can learn about the campus. This event is marketed to potential students to explore and learn about SDSU.

More Info: http://arweb.sdsu.edu/es/explore/

5. Maker Faire San Diego

Summary

Location: Balboa Park

Date: Oct 3 - 4, 2015 & Oct 1 - 2, 2016

Duration: 8 hours per a day

Audience Demographics: All Ages, Southern California Resident

Description: Tabled during the San Diego-wide maker faire to promote the student work for the build IT makerspace and network with other makers in the community.

More Info: http://sandiego.makerfaire.com/


sd maker faire

6. Tech Forum 3D Scanning

fleet museum

Summary

Location: Tinkering Studio, Fleet Science Center

Date: Aug 13, 2016

Duration: 2 hours

Audience Demographics: All Ages, Museum Visitor

Description: Taught 3D printing and 3D scanning by demonstration of creating 3D scans of people and allowing them to keep the export file to print.

More Info: http://www.rhfleet.org/events/introduction-3d-printing-and-cad-drawing-workshop


7. We are STEM!

Summary

Location: The O’Farrell Charter School*

Date: Feb 25, 2016 & Feb 16, 2017

Duration: 2 hours

Audience Demographics: Female Student, Ages 10-14

Description: Middle School girls came to the build IT makerspace to learn about emerging technology. SDSU students designed a 3D printed solar system

bracelet that each girl got to paint and take home.

More Info: https://buildit.sdsu.edu/solar-system-bracelets/ & http://newscenter.sdsu.edu/sdsu_newscenter/news_story.aspx?sid=76055

* This was a partnership between The O'Farrell Charter School, the SDSU Mesa Program, and the build IT makerspace. For the event, students were brought to San Diego State University. 

mesa girls event

8. Reward Field Trip

south county boys and girls club

Summary

Location: Boys & Girls Club of South County*

Date: Sep 16, 2016 & Apr 26, 2017

Duration: 2 hours per a day

Audience Demographics: Ages 10 - 14, Boys & Girls Club Kids

Description:  As a reward for completing an after-school tech program, kids came to the build IT makerspace to explore and play with its vast collection of emerging technology.

* This was a partnership between The Boys & Girls Club of South County and the build IT makerspace. For the event, students were brought to San Diego State University. 


lightbox side by side

Lightbox V1.1

Design

Lightbox v1.1 was constructed similarly to our first lightbox, with some minor differences.

lightbox side by side

Left: new lightbox, Right: original lightbox

The new lightbox is also constructed from foamboard, posterboard, and a semi-translucent material. The foam board was joined together with hot-melt adhesive (also known as hot glue) rather than duct tape. To reduce waste, the windows panel frames were made from 2 inch strips of foam board, rather than cutting squares out of whole sheets. The construction method is detailed below.

Construction

lightbox miter uncut

A knife was used to divide sheets of foam board into 2 inch strips, 20 inches long. A 45 degree cut was made on both ends of each strip. In this example, shorter pieces are used to demonstrate the process.

lightbox miter cut

After the ends of each strip are cut, hot glue was used to join the foam edges of the strips to form the corners of the frame.

lightbox miter glued

A square was used to ensure that each strip was joined at right angles to make sure the frames of the box fit together properly.

Details

lightbox corner outside

To join the 5 frame pieces together, hot glue was used to join the edges together. Excess glue was spread along the edges to increase strength.

lightbox inside cloth

In the first lightbox, the fibers in the cloth are visible and the material does not disperse the light as evenly, resulting in a more focused spot of light.

lightbox corner inside

The translucent material used is 0.003 inch thick matte drafting film. For the window frame panels, the film is glued onto the inside of the frame.

lightbox inside film

The drafting film allows the light to diffuse more evenly, resulting in better picture quality.