Before We Begin
Necessary Terminology
Extruder - This is a part of a 3D printer. This is the part that heats up to nearly melt the material so that the material can be worked with. A motor pushes the material through the hot part and out of a nozzle at the end.
Filament - This is the material that is extruded. In the case of buildIT, we use a Polylactic Acid (PLA) plastic filament. For more information, please see the post about materials.
Print Bed/Build Plate - This is a part of a 3D printer. This is the part of the printer that the filament is extruded onto. On some of our printers, this is a heated plate with or without glass on top. On others, it is simply a glass plate.
Painters Tape - This may not seem like it, but this is an important part of 3D printing in buildIT. This material is the exact same as the one you would purchase for painting a room in your house. The tape is placed on the print bed so that the material has a rough surface to adhere to. If the tape wasn't there, the material would have a much harder time staying in place.
Layer Height - This is the amount the extruder moves vertically between each layer of the print. This number is usually a fraction of a millimeter for our printers. For more information, please see the post about resolution and layer height.
Warping - This is something that can happen to a print. In some prints, the edges of the part will curl up, away from the build plate. This can happen for a variety of reasons, including the part being too big or too thin. Usually, a part will need to be reprinted if the warping is severe enough.
What is a raft?
Technical Description
A raft is an extrusion at the beginning of a print to help a part better adhere to the build plate. Prints that fail due to warping or detachment usually require reprints with rafts.
Explanation
A raft is some extra plastic that a 3D printer lays down before starting the actual part. The printer lays down about 3 layers in a very simplistic pattern on the build plate. The reasoning is very simple - even with the painters tape, plastic sticks best to other plastic. The idea behind a raft is to give the plastic something solid to attach to before creating the part. The layer height between the raft and the bottom layer of the part is larger than the rest of the layer heights. The idea is to make the raft easy to remove from the part when the part is done.
In the simplest terms, a raft is temporary, extra plastic that the printer lays down before starting the actual part to help the part adhere to the build plate. It is meant to be removed immediately after the print finishes.
When should I use a raft?
Steps to determine if a raft is necessary.
Once you gain some familiarity with the printer you're using and you've printed a few things, you'll start getting a sense on whether a part needs a raft before you try printing it. I'll discuss certain types of objects that usually need rafts below. Until you get an intuitive feel about rafts, though, there's an easy process to follow to figure out if you need a raft.
1. Try printing the object on the build plate without a raft. Consider adding glue if you have any doubts!
2. If the object doesn't stick to the build plate, becomes detached after a few layers, or starts warping, cancel the print immediately.
3. Assess why the print didn't go as planned. Did the printer have trouble extruding? Did you not use glue? Is there some mechanical problem that might have caused a failure?
4. If you've determined that there was no failure other than a lack of raft, add a raft and reprint!
Typical prints that require rafts
There are some prints that almost always require a raft in order to succeed. As stated above, getting a good sense of what needs a raft and what doesn't only truly comes from experience.
A raft is typically needed if:
• the object is smaller than about 10 mm in any direction at the base
• the object is thinner than about 3 layers at the extremities
• the object is larger than about 80 mm in any direction at the base
Essentially, a raft is needed if a part is too big, too small, or too thin.
What does a raft look like?

On the Printer
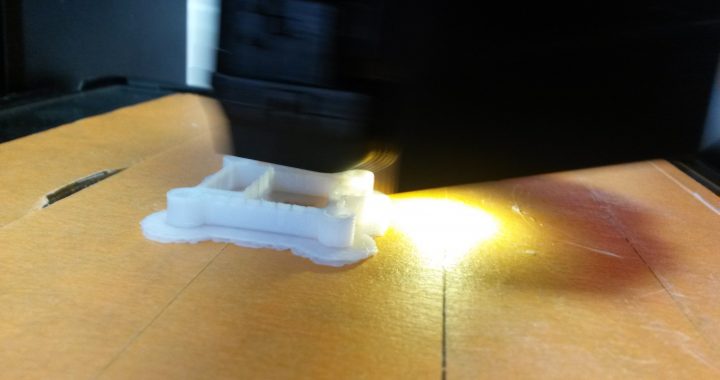
This is a picture of an object being printed on the Makerbot with a raft. This object is tc_fea's Miniature Castle from Thingiverse.
You can see that there is a large flat part, and a smaller part that extends further vertically. The large, flat part is the raft. The smaller part is the object. They are connected for now.

Off the printer, on the part

Off the printer, off the part
The raft and the object have now been separated! At this stage, the object is completed. The raft is now trash. It can be disposed of in a trash can or in our plastic waste bin.
Remember to clean up after yourself!
How do I add a raft?
Adding a raft is easy!
The way you add a raft depends on the 3D printer you're using and its associated software.
A quick reminder on software association with printers:
• Rostock uses Cura
• Flashforge uses Cura
• Makerbot uses Makerbot Desktop
• CubePro uses CubePro
To add a raft using Cura
The two pictures show screenshots of Cura.
The picture on the top shows a green circle around "Platform Adhesion Type." Click on the dropdown selector next to "Platform Adhesion Type."
The picture on the bottom shows a red circle around the dropdown options. Click on "Raft."


To add a raft using Makerbot Desktop
The two pictures show screenshots of Makerbot Desktop.
The picture on the top shows a green circle around "Settings." Click on Settings.
The picture on the bottom shows a red circle around the checkbox on the settings menu next to "Raft." Click so that the checkbox has a checkmark in it.


To add a raft using CubePro
The two pictures show screenshots of the CubePro software.
The picture on the top shows a red circle around "Build." Click on "Build" to begin changing settings.
The picture on the bottom shows a red circle around the "Sidewalk Material" and a green circle around "PLA White." For the CubePro, "Sidewalk Material" simply means the material the raft will be made out of. The CubePro allows the user to select the color and filament material for the rafts, which is why we have a color option. As we only load one cartridge of filament at a time, simply select whatever color it offers.


She has been a volunteer or student employee in buildIT from 2014-present.
Lindsay built her personal 3D printer in 2012.
- 3D Printing Do’s and Don’t’s for BuildIT - March 8, 2018
- Supports - June 28, 2016
- Materials for 3D Printing - June 28, 2016